Setting up PyTorch on Mac M1 GPUs (Apple Metal / MPS)

I'm currently taking the Deep Learning nano degree offered by Udacity to deepen my knowledge of modern Machine Learning and Deep Learning.
The course walks through the basics of ML and introduces PyTorch and will require knowledge of it in later stages.
This post will be short and sweet and simply walk you through the steps you need to take to make use of PyTorch using a standard Python installation and have a GPU enabled. This is all possible with PyTorch nightly which introduces a new MPS backend:
The new MPS backend extends the PyTorch ecosystem and provides existing scripts capabilities to setup and run operations on GPU.
This was previously announced on the PyTorch Blog and is a good read in and by itself. The expected improvement over regular CPU training/evaluation looks spectacular, but
Installing Python
I use asdf to manage the languages I work with. It can be installed with brew install asdf. This adds a small shell script that you can use to install plugins and individual versions. We'll start by adding the Python plugin:
asdf plugin add pythonWe can then list all available versions using:
asdf list all pythonTo install a version and make it the global default we simply run:
asdf install python 3.10.7
asdf global python 3.10.7
Refer to the asdf documentation to learn more about all its features and supported plugins.
Note that at the time of this writing PyTorch is not compatible with Python 3.11 - we'll use the latest 3.10.x release instead.
Setting up our work environment
For the first project I want to set up a virtual environment with all the core dependencies and a Jupyter Notebook installation for easy exploration. We'll start by creating a virtual environment and activating it:
python -m venv .venv
. .venv/bin/activateFrom here we can use the configuration tool on the PyTorch website to get the installation command for the nightly version.
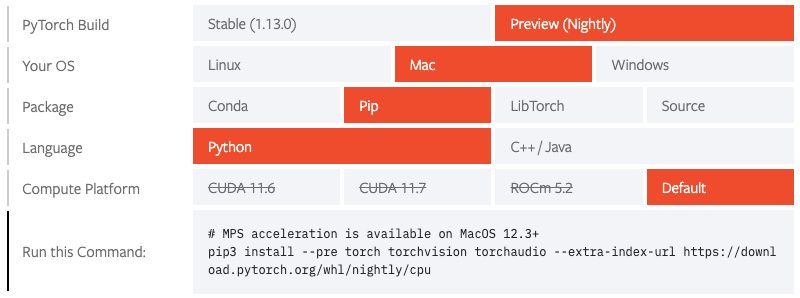
pip3 install --pre torch torchvision torchaudio --extra-index-url https://download.pytorch.org/whl/nightly/cpuWith this we should have PyTorch installed and ready to go. We can validate our installation in the Python REPL:
$ python
Python 3.10.7 (main, Nov 17 2022, 15:26:39) [Clang 14.0.0 (clang-1400.0.29.202)] on darwin
Type "help", "copyright", "credits" or "license" for more information.
>>> import torch
>>> torch.backends.mps.is_available()
True
At this point I was able to follow the PyTorch tutorial and leverage my GPU. In places where the tutorial references a CUDA device, you can simply use the mps device.
I'm excited to have a powerful GPU readily available on my machine without the need to build a separate rig with CUDA cores. Given that I'm new to this field I'm not sure how far the Apple GPUs will take me, but for now they can support me in my learning journey.